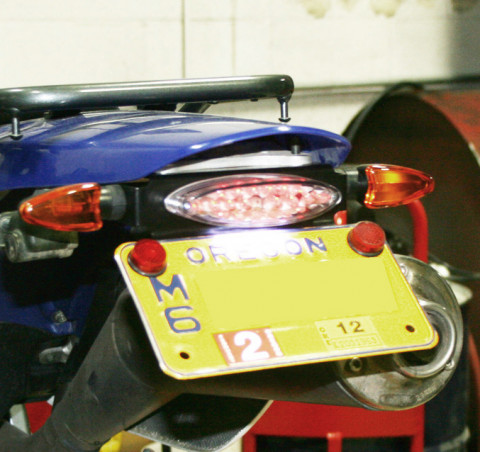
Installation of the ProCycle DRZ400 taillight and license plate bracket is pretty simple, but we thought we would help you with some of the finer points.
Tools Required
- 8mm wrench or socket
- 10mm socket and wrench
- 5mm allen wrench
- Wire cutters
- Crimping tool (for butt connectors)
Remove old taillight and bracket
- Remove the two bolts that hold the rear rack and seat on. Be sure and keep track of all your hardware.
- Remove the seat.
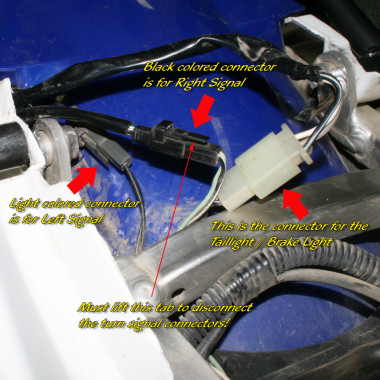
- Disconnect the wiring plug for the taillight from the main harness.
- Disconnect the two turn signal wiring plugs also.
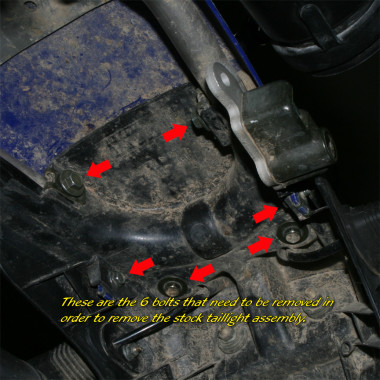
- Remove the six bolts that hold the stock rear taillight/license plate bracket to the sub-frame and then remove the entire assembly.
Install new taillight and bracket
- Replace and tighten the two bolts that go through the fender and secure the rack in place.
- We recommend that you cut the leads for both signals and the taillight close to the plastic so you can reuse the connectors. More information about this below.
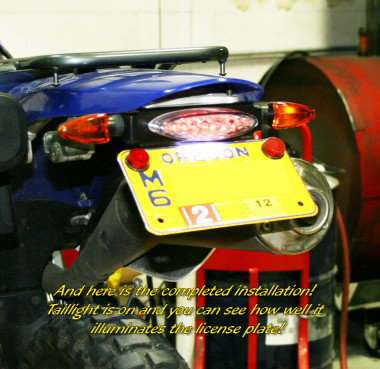
- Attach the new LED taillight/brake light to the ProCycle bracket. Be sure that the small clear portion of the lens is on the bottom as it will illuminate your license plate and keep you legal. (Mount it upside down and you will have a really neat glow inside your fender!) You can shorten the screws when you are done if you like. Though not necessary, will make the rest of the installation just a bit easier.
- Install the two turn signals to the bracket as well at this time and tighten them down.
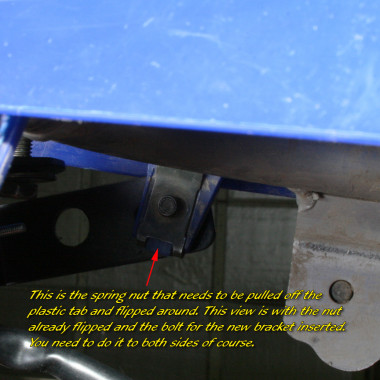
- Slide the two spring nuts that are on tabs on the sides of the fender off, turn them around so the nut portion is inside the fender, and then slide them back up onto the same tabs
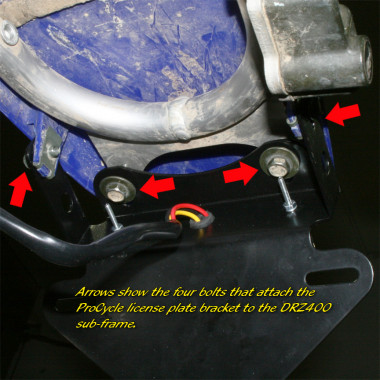
- Mount the new bracket up underneath the fender. The bracket goes OUTSIDE of the tabs with the spring nuts so that the heads of the bolts are go through the bracket and then into the spring nuts.
- Place two bolts up through the bracket and into the two threaded holes on the sub-frame. Tighten all of these down securely.
- Run the new taillight / brake light wires forward through the hole in the fender where the stock wires were.
- Plug the lead for the taillight / brake light that you cut-off from the stock taillight and plug that back into the plug that it came out of. Cut the wires approximately 4 inches beyond the connector.
- Strip the plastic housing back approximately 1 inch from the end. Strip approximately 1/4 inch of the insulation off the end of each wire and twist the ends of the wires.
- Slide one butt connector onto the end of each wire and use your crimping tool to crimp the connector onto the wire. After you are done, tug on the wire to verify that it is securely held. Do this to all three wires.
- Take the new lead from the taillight and trim it so you have enough slack to tuck it securely out of the way for the seat and then cut it. DO NOT cut it too short! Remember, you can always cut it shorter if you need to later!
- Strip the plastic casing back approximately 1 inch from the end. Strip approximately 1/4 inch of the insulation off the end of each wire and twist the ends of the wires.
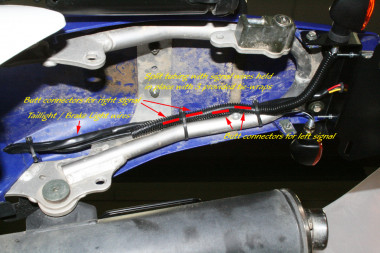
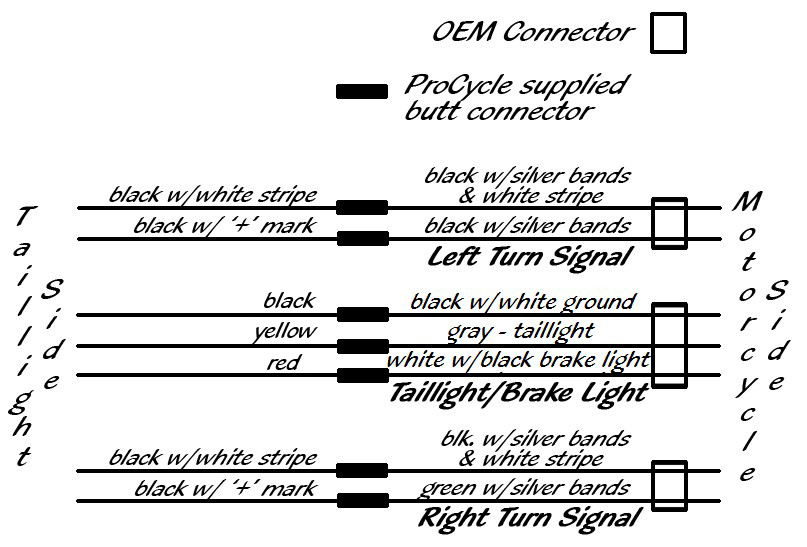
- Insert the Yellow wire from the taillight into the connector for the Black w/White stripe wire from the harness and crimp it down.
- Insert the Black w/White stripe wire from the taillight into the connector for the Gray wire from the harness and crimp it down.
- Insert the Red wire from the taillight into the connector for the White w/Black stripe wire from the harness and crimp it down.
Image
- Test all three connections to verify that the wires are secure in the butt connector. Turn on key and verify that your taillight comes on. Operate the brakes to verify that the brake light also works correctly.
- For the turn signals, you need to cut the male connectors off the end of the wires and we found it is best if you clip one wire right behind the connector, and the second one about 1 inch back. This allows you to stagger the butt connectors when putting them in the split tube, allowing them all to fit.
- Strip approximately 1/4 inch of the insulation off the end of each wire and twist the ends of the wires.
- Slide one butt connector onto the end of each wire and use your crimping tool to crimp the connector onto the wire. After you are done, tug on the all the wires to verify that they are securely held in the connector.
- The turn signal wires from the gray OEM connector are for the LEFT side and those out of the black connector are for the RIGHT. (Refer to the connector image near the top of this page.)
- Place the turn signal leads from the main harness out to the where they meet the wires from the correct turn signal and cut them to match. Remember to stagger them if you staggered the turn signal wires. Also, remember to leave some slack initially. Do not cut them too short!
- Once trimmed, strip the plastic sheath back and strip them approximately 1/4 inch from the end and twist the wires. Crimp them into the correct connector and test that they are securely anchored.
- Turn on the key and test that both blinkers work as they should. If you made a mistake you will be glad you left some slack. You can curl up any unused slack under the seat.
- Once all the connections have been made, place the turn signal wires in the supplied split tubing.
- Use the supplied tie-wraps to secure the wiring to the frame rails.
- Tuck all wires out of the way and reinstall the seat and tighten all hardware down securely.
Front turn signal installation
- If you purchased the matching front signals, start by removing the plastic headlight shell (3 screws - 1 on each side and one in the front on the lower triple clamp).
- Disconnect the wires for each signal, noting which plug is the right, and which is the left.
- Unbolt the stock mounts from the upper bolts on the triple clamp - DO NOT REINSTALL THESE BOLTS YET!
- Place the new turn signal mounts on the triple clamps and reinstall and tighten the bolts. Refer to your owner's manual for the correct torque values for these bolts.
- Bolt the new turn signals in the new mounts and tighten them up.
- Cut the wire off the old turn signals so you can still utilize the stock plugs.
- Cut the male connectors off of the end of the turn signal leads.
- Just like for the rear turn signals, strip the ends and then connect the signal leads to the harness wires with the supplied splice connectors.
- Test the blinkers to be sure they are functioning correctly
- Organize and wrap the connectors behind the headlight shell and replace the headlight shell.
- GO RIDE!
If you have any questions, please feel free to give us a call at 541-688-9543. Or you can send us an email, info@procycle.us.
