
DR650 ProCycle Side Racks Installation Instructions
(See available PDF for printable version, or see linked videos at the bottom for visual help)
DR650 ProCycle Side Racks Installation Instructions
Please read and understand all of these instructions prior to installation
This kit contains the following parts:
| Qty. | Description |
| 6 | 8mm x 25mm Bolt |
| 4 | 6mm x 20mm Button Head Allen Bolt |
| 4 | 6mm Nylock Nut |
| 2 | 8mm x 40mm Bolt |
| 2 | Spacer |
| 1 | Left Side Rack |
| 1 | Right Side Rack |
| 1 | Side Rack Cross Brace |
| 1 | Installation Instructions |
Tools required:
Whatever tools it will take to remove existing hardware - unknown
10mm Wrench, Socket or T-Handle
4mm Hex Wrench
Blue Loctite (or a ‘removable’ thread locking compound)
We highly recommend that you thread lock all bolts prior to installation. Periodically re-check all nuts and bolts to maintain rigidity and structural integrity.
- If you have the OEM Suzuki accessory rack you will need to grind 1/8” off the inside of the mounts at the rear of the seat. This creates enough room for the side rack tabs to fit underneath the top rack mounts so they can use the same mounting location.
- If you have the factory grab handles in place, remove them, they will not work with these Side Racks. ProCycle Side Racks are designed to replace the stock grab handles as we use those mounting positions for these Side Racks.
- If you have a Pro Moto Billet, Nomadic, TCI Borrego or Pat Walsh Rack, remove the mounting hardware only (not the rack) as these Side Racks will use those same mounting locations with new hardware.
- Remove the passenger foot pegs. The lower mounts use these positions. You will have the option of remounting the pegs later.
When mounting racks, do not tighten any hardware until all mounting bolts are in place! Just start the bolts a few turns.
- Mount the right-side rack first using a longer 8mm x 40mm bolt in the rear position. (See image below.) If you have a TCI Borrego rack or no tail rack, you will use one of the two spacers provided here. The other spacer will go in the same location on the other side.
Image
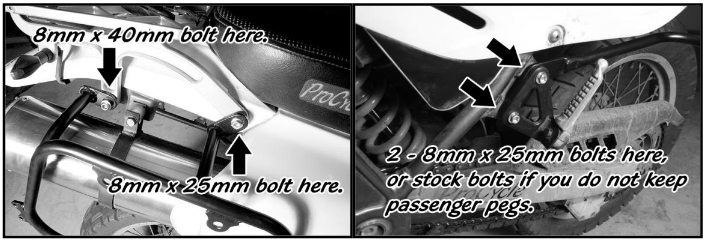
- Use one of the 8mm x 25mm bolts for the forward position. Be sure that the lower Side Rack mounts are on the outside of the peg mounts. (See image above)
- If you want to mount the passenger pegs, they will go over the rack mounts and use two of the 8mm x 25mm bolts provided in our kit. If you don’t want to mount the pegs, you can use the stock bolts for the rack mounts.
- Repeat steps 4 through 6 to mount the left rack. Again, do not tighten bolts yet, just start them.
- The crossbar goes INSIDE the tabs on the racks (See image below) with the longer leg on the right. Use four 6mm x 20mm button head Allen bolts with nylock nuts to mount rear crossbar to racks.
Image

- Once all of the hardware is in place, please tighten the four bolts on the right rack first, then the four bolts on the left rack and then the four bolts that hold the crossbar in place.
Image

DR650 Side Racks
DR650 Luggage Rack System