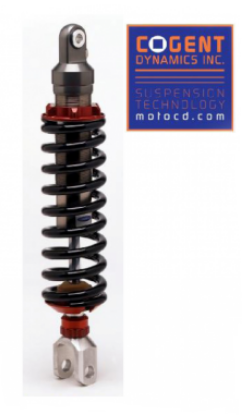
“Mojave” Damper (Shock) for the DR650
Cogent Dynamics Inc.
Damper Unit Owners Information
Introduction
Our new damper assembly (or ”shock”) consists of a damper unit and spring and is built to exacting specifications using the finest materials. Best of all, it has been custom configured for you and your motorcycle. Spring rates have been selected to match your rider weight and type of use.
Please refer to your motorcycle manufacturer’s owners and service manual for all settings and installation recommendations. This Cogent Dynamics handbook is not intended to override any of the manufacturer’s recommendations.
The damping in your new shock is controlled via an advanced piston design that provides a varying damping force that automatically adjusts to the velocity and frequency of the rear wheel travel over bumps. Your damper assembly is designed with gas pressurization that helps to prevent cavitation of the damper fluid through the piston and valve parts even under demanding riding conditions. To prevent the formation of foam and micro bubbles that would otherwise compromise the damper’s performance, a special floating piston is used that totally separates the gas charge from the damper fluid.
An adjustment knob is located on the lower portion of the shock just above the mounting eye or clevis. This adjustment knob controls an internal jet that allows “bleed” or a bypass of fluid within the damper piston. Adjustment of this control will have the most effect of the damping at the lower speed ranges of damper excursion as the jet tends to reach a maximum flow capacity, allowing the damper piston and shim arrangement to takeover and provide a majority of the damping force. This damper can be internally modified to further change its damping force curve should you desire.
Setup and adjustment of your damper
Static Sag
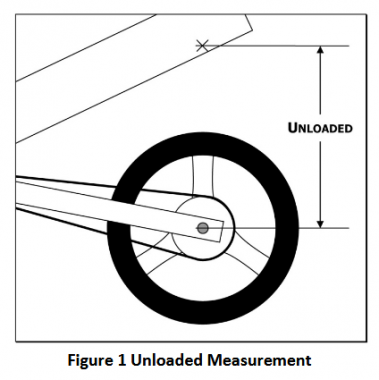
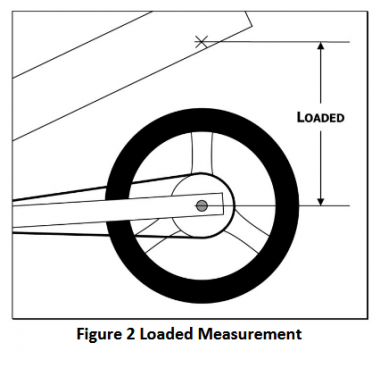
One of the most important settings for your rear (and front) suspension is sag. The rider sag is the measured difference between the axle centerline and a fixed point on the tail section of the motorcycle when the rear wheel is in the FULLY extended position (wheel off the ground) compared to the laden compressed position with the rider in his or her gear sitting on the bike in a normal riding position. See Figure 1 Unloaded Measurement and Figure 2 Loaded Measurement below. The difference between these two measurements is your static sag.
Performance of the rear suspension is best when working sagged about 1/3 the available travel. For the DR this works out to about 85 mm. Adjust this sag by increasing or decreasing the preload on the spring by rotating the threaded spring support collar. Increasing or decreasing the amount of preload will not change the spring’s stiffness, it will only bring the rear of the bike up or down within its travel.
It is important that the rear damper can respond to dips and bumps without excessive toping or bottoming of the damper. The sag recommendation is a guideline and experimenting with settings +/- 10mm from the suggested optimum settings maybe advantageous to some riders. To adjust the spring collar using the supplied pin wrench, please be sure the wrench is fully inserted into the holes provided (drilled in a radial pattern) around the OD of the threaded spring perch. Using both ends of the pinwrench you will be able to rotate the spring collar should you wish to make sag adjustments to the shock.
Supporting the rear of your bike on a center stand or lifting up on the rear helps reduce the spring load and the turning of the spring perch will require less force.
There is a threaded hole provided in the perch to allow for a special lock screw that we have deemed to be unnecessary. Please do not fit any threaded device into this hole, as it is possible to damage the shock. If you find that a locking screw is needed, please contact us for support.
Damping Adjustment
At the time of construction, the damping adjuster was set at a recommended starting point for each customer and tested on the Cogent Dynamics damper dynamometer. Please feel free to experiment with different settings of this control. Turning this knob in the clockwise (looking at the knob from below when mounted on the bike) direction will cause the damper character-istics to become firmer and cause the rebound to become slower. Turning this control in the counter-clockwise direction will cause the damper to become more compliant and the rebound to become faster.
There are approximately 25 or more “clicks” of total active adjustment available and it is important to count the clicks from the fully closed position (fully clockwise). When closing the adjuster, you are contacting the adjuster needle into its seat and it is very important to not exert any more force than needed to feel the closed condition. Sticking or damage to the needle and jet can occur from over-tightening this adjuster in the seated and closed position. We recommend you record all the setup changes you make to your damper assembly so you can keep track of your changes. Keep notes relative to the changes that you perceive when riding. A good way to approach the damper control setting is to back off (CCW) the adjuster until you feel the rear of the bike becoming a bit “loose” and less “glued to the road” feeling. Once you reach that loose point add 3-5 clicks to bring back the secure feel.
What is “good suspension”?
Overview
Our customers often ask what a good suspension setup should feel like. This can be a complicated answer to express but we will make an attempt at describing some rough guidelines of what to look for: One of the first things I look for is that the motorcycle doesn’t do anything bad when cornering on rough surfaces.
When you are negotiating a curve under these conditions, are you feeling relaxed and confident or are you tense waiting for an undesirable effect? Things that normally make riders lose confidence (and even traction when extreme) are:
- A sharp jarring sensation
- A loose feel
- A wobble or weave
A combination of all problems is possible, a loose feeling is generally due to inadequate damping forces that allow the motorcycle to wallow and move making the bike not hold its arc in a curve.
Excessive damping or spring rates in some cases cause harshness but we have seen more instances where an overly soft setup causes the suspension to begin to bottom and feel hard. At the end of the day, predictable traction is what good suspension is all about. While riding straight up and down (not cornering significantly), the rider should also attempt to feel what is going on; the wheels should follow undulations smoothly and the wheel should feel like it is following the surface you are riding on. There should not be sharp jarring sensations coming through to the rider yet there should be a feel for the road or trail surface being transmitted.
When a larger bump is encountered, the wheel should move to absorb it without skipping and without much secondary motion (the bike should remain level and stable after the bump has been negotiated). Your suspension should feel like it is moving and a rare bottoming of the damper unit or fork is acceptable when encountering extreme conditions. In general, a rider looking for touring comfort will look for a softer set-up that gives the best isolation from the surface. A rider more interested in off-road riding will sometimes prefer a firmer feel that allows the motorcycle to make quick transitions with less energy being dissipated by the suspension components. If you find that the shock is bottoming, try adding about 3 clicks in the CW direction on the shock and conversely, if the shock never bottoms when on rough terrain, try backing off (CCW) by about 3 clicks. Feel free to experiment with this setting. We recommend you keep a note of the original setting and what changes were made. How your suspension feels to YOU is what is important!
ProCycle offers stiffer front fork spring for your DR650.
Rider Input
One of the very most important factors in a motorcycle’s suspension operation is the rider’s input. During acceleration and deceleration, a motorcycle’s weight will transfer backwards and forwards, respectively. On a typical motorcycle, the rider can transfer 150-200 pounds of weight from one wheel to the other by just changing the throttle position by a few degrees! For this reason, throttle changes should be made smoothly. Whacking open the throttle will cause the rear suspension to rapidly extend as well as become less compliant to surface irregularities and in extreme cases, result in loss of traction or massive weight transfer.
When applying the front brake, the front suspension WILL compress. The front damping and spring work together to manage these forces, brake application should be smooth, even when applied rapidly. The correct application of braking forces allows the suspension to transfer the braking energy to the front tire in a way that allows the tire to take a set and conform to the ground where it can develop traction. Snapping on the brake will lead to traction loss. The front compression damping controls the onset of the brake forces while the spring is what will ultimately provide the support and resistance to bottoming while on the brakes.
Overall, you should feel a confidence-inspiring and comfortable ride that adds to the overall experience. Try to pay attention to the details explained below when you’re riding. Feeling the dynamics involved in operating your motorcycle can only improve your ability to operate and enjoy your machine.
Acceleration
The rear suspension is strongly affected by the chain forces under acceleration. Hard acceleration will cause the rear of the bike to rise up countering the additional load that is transferred from the acceleration forces this fact together with the forks’ extension will raise the bike, adding ground clearance. The forces on the rear suspension also cause it to feel firmer under acceleration caused by the application of more throttle.
These throttle control facts are a useful tool when cornering or crossing rough terrain! When a rider rolls on the throttle, he or she should feel the forks extend smoothly and the rear of the bike should take a set (the rear extends, or comes up slightly) in a way that is smooth and confidence inspiring. Rolling off the throttle should cause the rider to feel that same weight transfer reverse in a smooth way and the rear will add compliance and the front fork should settle back to a neutral position.
Deceleration
Deceleration will lower the front of the bike when entering a corner as the front wheel will gain traction and the steering geometry will become a little quicker as the weight transfers to the front wheel and compresses the fork. This can also be a great tool for cornering!
When braking, there will be brake dive on any motorcycle with apro-dive suspension (like typical telescopic forks). You should be able to feel the front lower during braking but it should be smooth and confidence inspiring as opposed to the feeling of front end collapse when the brakes are applied. When braking medium hard (not doing a stoppie) the forks should still offer good feel as well as offer some amount of bottoming resistance when encountering bumps.
Care and Maintenance
General Chassis Care
The suspension performance and feel is very much a function of the motorcycle’s chassis functioning correctly as a total system. Having a good balance between the front and the rear suspension is a worthy goal. For optimum performance it is critical that other chassis components are in excellent functional condition and adjusted properly.
Key things to keep tuned and maintained include:
- Wheel bearings
- Steering bearings
- Swing arm pivot bearings
- Suspension rocker bearings and pins
- Smooth and unworn fork slider bushings
The smooth and solid function of these components contributes greatly to a good suspension. We also recommend that you pay close attention to wheel alignment and chassis fastener torque. On many bikes, loose engine mounting bolts can be a cause for poor handling and performance. Most of us ride our motorcycles as a form of recreation and enjoyment. It is hard to put a price on what that enjoyment is worth. The extra effort in making your motorcycle perform properly and well always pays back with a high degree of satisfaction and added pleasure for the rider. Many small details can contribute to one happy rider!
Caring for Your Damper Assembly
Your new damper was built with care and will provide you with many years and many miles of great performance. Keeping it operating like new over its long life is an important part of enjoying it.
Cleaning
It is good to keep the damper assembly clean and washing it with soap and water is a good thing. Avoid spraying high-pressure (pressure washers) water directly onto the damper as this could force water and dirt past the rubber sealing components and cause contamination of the damper internals. Do not use strong chemicals, soaps or solvents on your damper. Pulling the rubber bottoming cushion up on the shaft (use a screwdriver or other suitable tool but take care not to scratch the damper shaft) and clean the junction area of the bottom clevis and damper shaft. The hard coated damper shaft should be kept clean and free from build up or corrosion.
Spraying the damper with a mild lubricant/protecting agent is recommended and helps prevent corrosion.
Component Parts
The top of your shock is equipped with a swivel eye that allows for a small degree of twisting movement of the installed shock. This part of the shock is called the “Cylinder Head” and is equipped with a special fitting with a small Phillips drive screw at its center. This special fitting is used for introducing the high-pressure nitrogen charge when building and servicing the shock. Under no conditions should this shock be disassembled in any way, the internal pressurization makes it dangerous to do so. Servicing should only be carried out by trained specialists.
The shock cylinder contains the damping fluid and damper components. The bottom of the shock has the shock shaft that slides in and out of the shock body on bumps. The shock shaft seal keeps the damping fluid within the shock body but a slight coating of fluid or seal lubricants normal on this shaft.
At the very bottom of the shock is the mounting clevis or eye. Since the shock shaft is able to rotate within the shock body, it is possible to have the top and bottom mounting components to be out of alignment from each other. If you find this to be the case with your shock, place a suitable shaft (a #3 Phillips screwdriver works well) through the mounting holes and twist it back into the correct alignment. The twisting force to do this need’s to overcome the friction of the spring.
Regular Service
We strongly recommend that your damper assembly be returned to Cogent Dynamics Inc. for servicing every 10,000 to 20,000 miles or two years, whichever comes first. The damping fluid contained within the damper assembly will become contaminated and lose some of its properties over time. Moving parts inside the damper are subject to wear.
We offer you a 1 year warranty against defects in parts and workmanship to the original purchaser only. If you have an issue with your Mojave, please contact us immediately.
Failed or worn parts or old damper fluid will reduce the damping efficiency and can even cause external leaking. Grueling off-road use will shorten the service interval requirement of any shock. If you use your DR in this way, servicing once a year is recommended. Regular service will help assure a long life at the same performance level as new, and any competent suspension shop can service your new damper assembly.
Sending the unit back to Cogent Dynamics will assure you of a quality inspection and service at a reasonable cost. During this service any wear parts in need of replacement will be installed at no additional charge to the original purchaser.
To qualify for this special service, the shock must be maintained to the standards recommended in this booklet. While the flat rate service charge may change over time (at the sole discretion of Cogent Dynamics Inc.) It will be based on a reasonable standard charged by other shops. The cost for this service at the time of this booklet’s creation is $75. Parts damaged from misuse or crashing will not be covered by this offer.


