Important: All appropriate safety equipment and gear must be used during the installation of this or any other ProCycle product including any time you work on a vehicle. ProCycle accepts no responsibility for injuries or damage incurred during the installation of any products.
Needed Tools:
- 6mm Allen
- 10mm Socket
- 14mm Socket
- #3 Philips
- #1 Philips
- Remove side panels.
- Remove seat.
- Remove tank be careful of any gas spilling when removing the fuel line.
- Remove the 2 14mm bottom bolts under the triple tree that hold the bar clamps.
- Remove the complete bar assembly with the clamps still attached. Be careful not to lose the rubber dampeners.
- Remove the turn signal indicator housing by removing the allen bolt by the key.
- Unplug the indicator lights and remove the indicator from the rubber housing by removing the philips screws on the back.
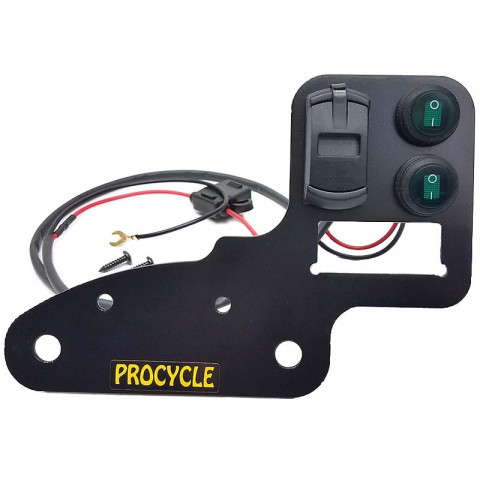
- Install the indicator onto the DR Dash by using supplied phillips screws.
- Run the wiring harness to the battery. Follow the backbone of the bike to open keyed auxiliary plug by the battery. Make sure that the wiring will not get melted or pinched. Secure with included zip ties.
- Reinstall indicator lights back into indicator housing.
- Install the DR Dash by sliding the clamp bolts through the appropriate holes on the DR Dash.
- Slide everything back onto the triple tree. Be cautious not to lose the rubber dampeners.
- Reinstall the bolts and tighten the bar risers back to the triple tree.
- Reinstall tank, seat, and side panels.
- Go ride!
*If you are adding auxiliary lights to your bike, the (+) positive wire coming from your aux light will go to the available spade on the bottom side of the rocker switch and the (-) negative wire from your lights can go to ground somewhere on your bike.
**The second rocker switch does not come with a (+) positive wire jumped to it, in the case you wish to install an additional component that is running its own dedicated power directly from the battery.