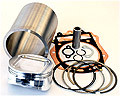
DR650 790 Big Bore Kit Installation Instructions
Image

- We recommend using a factory Suzuki service manual for engine teardown and assembly procedures.
- Note: The factory manual may have an error regarding head bolt installation. The head bolts are 3 different lengths. Mark the bolts so they go back in their original positions. (Note: Example - our shop copy of the factory manual has the bolt positions confused.)
- Sleeve to Cylinder interference fit should be 0.004”.
- Piston to bore clearance should be 0.002”-0.003”.
- Piston Rings must have the end gap properly measured/adjusted per the instructions included with the piston before installation.
https://www.youtube.com/watch?v=IoGjqtWVvqs - Piston to Valve clearance must also be checked prior to final assembly. This is a minimum of .050” for the Intake valves and .070” for the Exhaust valves. Here is a link to a video that explains this well. (Yes, the video shows it being done on a car motor, but it is just the same for a DR, only you just have to do one cylinder!)
https://www.youtube.com/watch?v=Y66lvdHbm60&spfreload=10 - The Cylinder Head and Cylinder surfaces must be clean, smooth and flat.
- When installing the head bolts, be sure the threads are very clean. Oil the threads generously with engine oil before installation. Head bolt torque is 29 ft/lb.
- We like the ‘MotoMan’ method of break-in for piston rings.
See: http://www.mototuneusa.com/break_in_secrets.htm for details. - Change the oil immediately after break-in.